

AOSP SurfaceSyncGroup
Android SurfaceSyncGroup
关于本文主要是用于基于 Android14.0.0_r73 用于分析 SurfaceSyncGroup 的逻辑
1.ViewRootImpl作为 Root,SurfaceView 作为 child2.Root 接受所有ready signal,最后将所有的Transaction 进行合并进行原子提交3.通过 add 方法添加pending syncs数目,构建Sync 树结构4.调用markSyncReady减少pending syncs 数目
SurfaceSyncGroup 案例分析SurfaceViewSyncTest案例分析
核心逻辑如下:
1234567891011121314// 1. 创建 SurfaceSyncGroupnew SurfaceSyncGroup(TAG);mSyncGroup.add(container.getRootSurfaceControl(), null /* runnable */);// 2. 添加 SurfaceView 作为 child sync groupmSyncGroup.add(m ...

2025
我的 2025
现在
2025 是忙碌的一年。也是我完全摆脱学校,”陷入“工作的一年。工作顺利。生命体征正常,心态、情绪、体重也都还算稳定……
当然今年也不是一无所获,还是学到了很多东西,主要是工作上的。
未来
木心说:“生命好在无意义,才容得下各自赋予意义”这句话说的非常好,我觉得人的一生都是在追求和寻找自己的意义和价值。而我也在寻找……
关于健康这是前几年我完全忽略的一点。直到我11 月份的时候称了下自己的体重……最后的结果是买了台跑步机,每天早上/晚上都会尝试着走走、跑跑。
有时候觉得精疲力竭有时候真的是一种享受,身体健康在任何时候都应该是放在第一位的,祝大家都健康(目前来看笔者的生命体征正常。)
关于阅读阅读是一种习惯,很难想象我居然坚持了 8 年了。
只是今年读书不多,或许后面的时间会越来越少。
关于厨艺现在的我强的可怕,已经能熟练的炒出家常菜,今年还尝试着使用了下香辛料,味道还不赖~
随记今天不学习明天变垃圾太久没刷lc周赛了,今天就做对一道题.
路漫漫其修远兮~
——2025/2/16
Don’t sell ...
Art Hook之Pine实现原理
Art Hook之Pine实现原理关于本文主要是对Pine core实现原理进行分析,聚焦arm64平台 & art虚拟机
概览
pine trampolines
pine hook有两种api
1.Pine.hook桥接到统一的桥接方法然后做方法的桥接执行
2.Pine. hookReplace桥接到自定义的桥接方法,自己管理方法的执行(感觉像是新加的功能,整体不是非常完善)
其中每一种api中依据实现原理还有一个分叉:
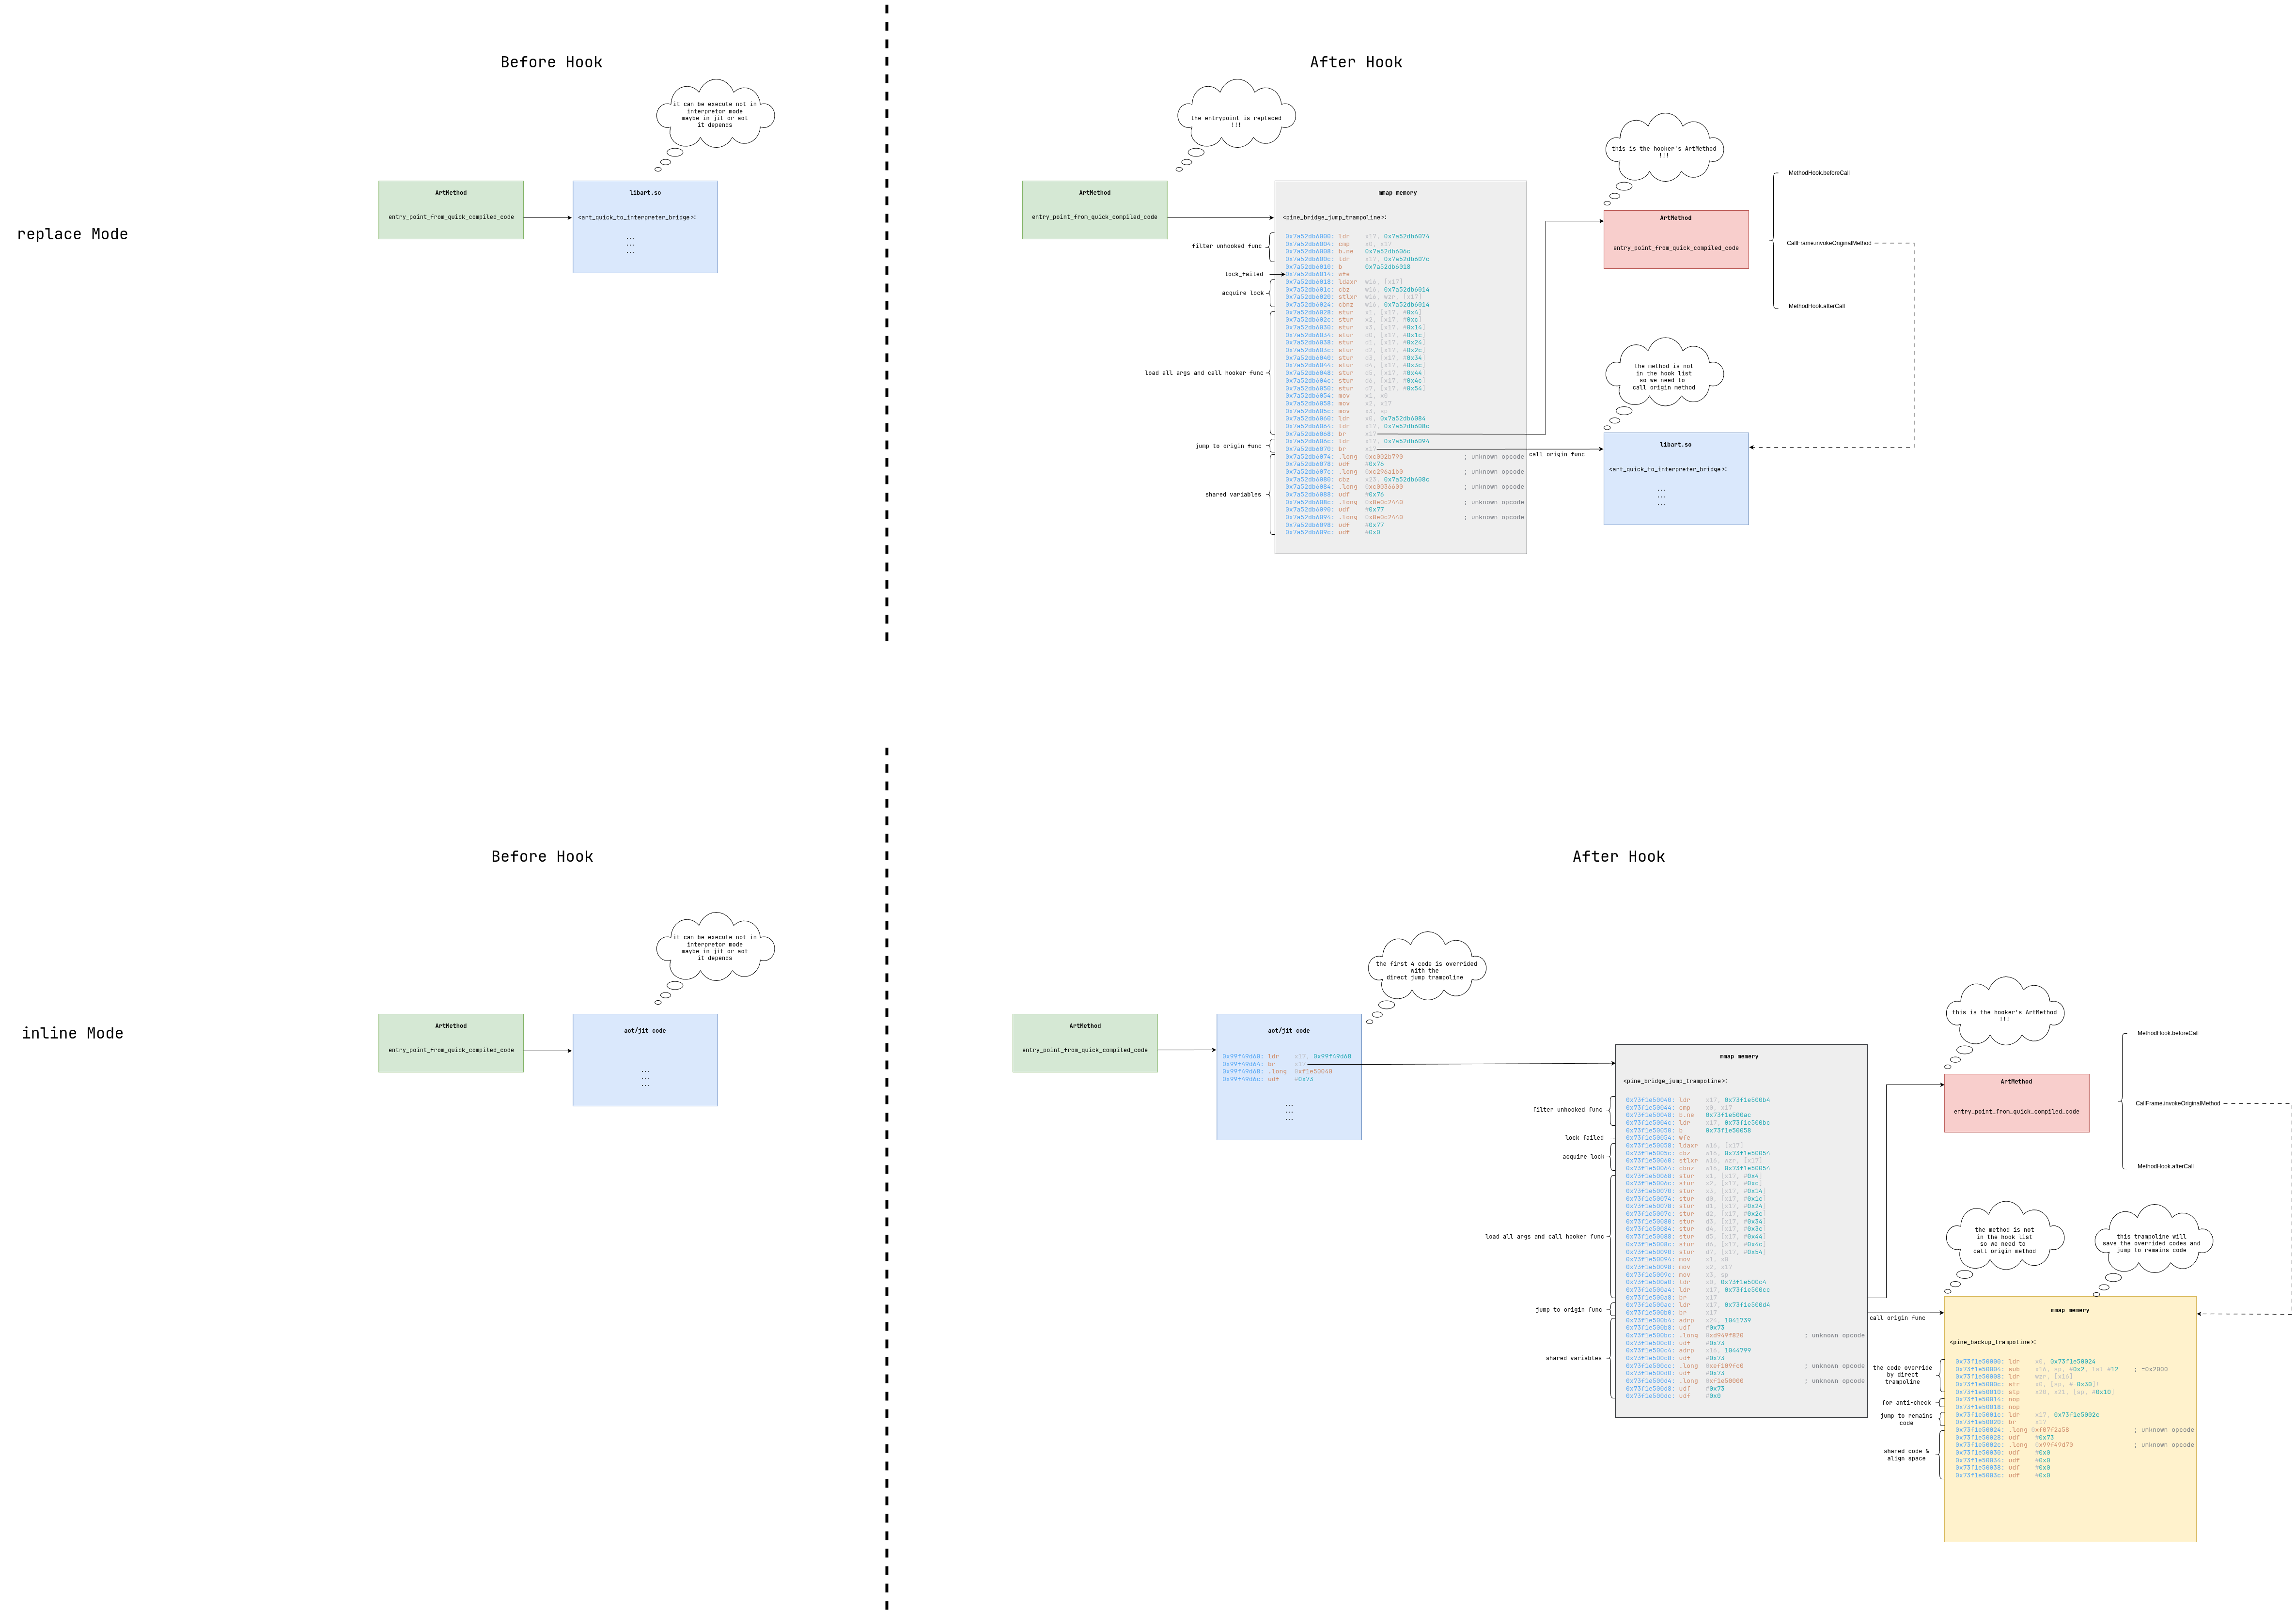
1.inline Mode:使用inline hook实现程序流程的拦截
2.replace Mode:使用方法执行入口替换的方式实现程序执行流程的拦截。
图pine trampoline列表
pine hook
图pine hook核心实现原理(tips:虽然提供了replace Mode & inline Mode,当前主要使用的逻辑是replace Mode,本着看都看了的心态对所有逻辑都进行类分析,读者可按需查看)
入口执行逻辑如下:1.前置判断过滤2.初始化3.全局回调——hook方法调用前4.获取方法底层C++的ArtMetho ...

android art hook之epic实现原理
android art hook之epic实现原理
图:Epic Art Hook实现原理简图
本文主要是对epic在arm64平台下art虚拟机下的hook的实现逻辑进行分析和学习。
再此感谢weishu大佬~
分析起点DexposedBridge#hookMethod是Epic hook 的入口,不过当前方法是一个包装方法,主要是封装了部分API,hook的核心逻辑在Epic.hookMethod中。DexposedBridge#hookMethod方法逻辑如下:1.前置检查,只支持普通方法 & 构造函数2.将Method和XC_MethodHook做绑定存入到Map<Member, CopyOnWriteSortedSet> hookedMethodCallbacks中去。
3.调用Epic.hookMethod开启hook逻辑
123456789101112131415161718192021222324252627282930313233343536373839404142434445464748495051525354// DexposedBridgep ...
Android AGP源码下载编译
Andriod AGP下载 & 编译源码安装简单问了下AI,虽然我不知道源码在哪,但是他知道。
https://android.googlesource.com/platform/tools/base/
但是再经过一些文档的查阅,让我发现不完全是这样的。
https://android.googlesource.com/platform/tools/base/+/studio-master-dev/build-system/README.md
最终我还是决定参考官方教程来。不过我这里没有拉官方的master分支,主要考虑是release分支会比较稳定。
12repo init -u https://mirrors.ustc.edu.cn/aosp/platform/manifest.git -b studio-2025.1.3repo sync
SDK软连接下载源码后我们的下一步就是用ide打开源码
The code of the plugin and its dependencies is located in tools/base. You can open ...
AOSP Soong 构建系统调试环境配置
AOSP Soong debug 环境配置前言Soong是一个用Go语言编写的专用于AOSP的构建系统。
近期”突发恶疾”,想着分析下构建流程。
由于网上关于Soong的调试教程较少,因此就有了本文~
流程1.go/dlv安装配置
2.waiting for debugger
3.attach to debugger
dlv安装1.go语言安装
2.安装dlv调试工具工具
wait for debuggersoong_ui的启动代码在如下的脚本中
build/soong/soong_ui.bash
12345678910111213141516171819202122232425262728293031323334353637383940#!/bin/bash -eu## Copyright 2017 Google Inc. All rights reserved.## Licensed under the Apache License, Version 2.0 (the "License");# you may not use thi ...
AOSP Microfactory
Microfactory基于Android14.0.0_r73
简单介绍:
Microfactory是aosp的一个go语言编写的构建工具,且主要用于对go编译进行缓存,实现增量编译的效果。
源码microfactory工具通过source build/blueprint/microfactory/microfactory.bash配置。
配置好以后shell中可以通过调用build_go函数触发并使用microfactory进行增量编译。
1234567891011121314151617181920212223242526272829303132333435363738394041424344454647484950515253545556575859606162# build/blueprint/microfactory/microfactory.bashfunction build_go{ # Increment when microfactory changes enough that it cannot rebuild itse ...

ARM AAPCS64
Arm64 aapcs解析之寄存器基础概念1.AAPCS (Procedure Call Standard for the Arm® Architecture)
see it
Register
Special
Role in the procedure call standard
SP
The Stack Pointer.堆栈指针
r30
LR
The Link Register.链接寄存器
r29
FP
The Frame Pointer堆栈指针寄存器
r19…r28
Callee-saved registers被调用方保存寄存器。调用方随意使用
r18
The Platform Register, if needed; otherwise a temporary register. See notes.平台寄存器
r17
IP1
The second intra-procedure-call temporary register (can be used by call veneers and PLT code); at other time ...

Android ebpf环境搭建
Android ebpf环境搭建主要用于配置ebpf的运行环境,开发环境不包含在内。
前言
关于本文:
本文主要用于介绍Android中如何搭建ebpf学习环境,难度较大/不断更新完善中。
前置准备:
a.设备最好要有内核源代码,因为涉及到内核重新配置/编译。如果没有则内核必须得是GKI内核。
b.设备需要解锁BL, 因为涉及Boot img刷入
c.设备内核最好在5.10及其以上的版本,因为ebpf的特性和内核版本绑定。
d.需要编译好的Linux rootfs,后续需要在Android上使用chroot运行rootfs
概览
编译自定义内核并刷入
Note:
别怕这里只是简单的改了几个内核参数。
改动不大,就是流程比较长。
安装bpftrace
安装BCC
内核配置准备
BCC内核配置
a.BCC需要的内核配置列表
b.Ftrace内核配置参数——具体过程可见下方[内核开启ftrace](##内核开启Dynamic FTrace)
安装bpftrace1apt install bpftrace
安装bcc
Note:
该过程必须使用源 ...
编译创建Debian rootfs并在Android 上运行
编译创建Debian rootfs并在Android 上运行refs:
博客1
博客2
Debian Wiki
背景
Android ebpf环境搭建
编译构建可在Android上运行的Debian rootfs环境
整体思路其实通过上述的refs很容易能看出来rootfs的安装流程很简单。通过debootstrap,下载安装到制定路径。
下载安装完成以后就可以通过chroot check是否生效。
确认Debian版本
版本的选择是安装过程遇到的第一个问题,由于Debian是和Linux内核版本绑定的,所以我们需要根据内核版本确认Debian的安装版本。
经过和Gpt的深入交流,总结得知Debain的默认内核版本可以通过如下方式查找。(不唯一)
首先我们可以通过release note地址去查看当前release的debian版本。
Debian Release Note
2.点击指定版本的link以后、进入release note,选择关注的架构
搜索Kernel以后可发现,debian 10 ~ debian 11 默认内核从4.19 更新到了5.10
因为目前 ...